RC PT-109 Project
Part Four
Want plans for this project? Get them at the Plan Store.
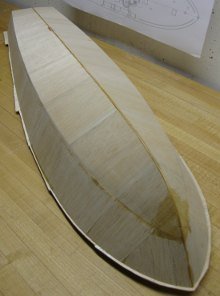
The RC PT-109 is receiving its hatch coaming, deck planking and keel ridge reinforcement.
At this point the PT-109 hull is planked with balsa sheet. The next step is adding a hatch coaming and planking the deck.

|
For a recap of the previous step of building this RC Elco PT boat, scroll to the bottom of this page.
PT-109 Access Hatch
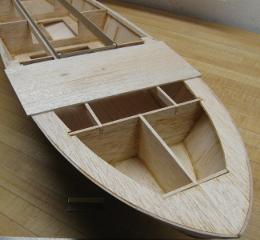
At this point the hatch area is well defined by the deck stringers running along the hull, but there is no structure to define its front and rear. To do so, I added a pair of false deck beams spanning between the stringers.
I got the location from the plan and measured and marked on the deck stringers with pencil. The beams themselves are 1/8-inch balsa scrap by 1/2 inch (same height as the deck stringers).

|
Hatch Coaming
So what's a hatch coaming?
A coaming is a vertical surface on a boat or ship that prevents water from entering the hull.
Water that runs on a deck for example is always trying to find the lowest point. No matter if a hatch has a weatherstrip, o-ring or grease to seal out the water, it seems water will always find a way in.
The best solution, and proven for centuries, is to build a raised frame around every opening on deck. This way water will naturally drain away and not enter the interior of the hull.

|
For the PT boat I opted to extend the superstructure rearward to give better access to the rudder linkage etc. Because this is a "semi-scale" model, a practical solution trumps "scale accuracy" in situations like these.
The engine hatch on the real boat ends before the aft 20mm Oerlikon cannon. Rudder access is something that I've come to appreciate over the years. Most people most likely isn't aware this is a compromise, so I decided not to be so hard on myself here. There is plenty of room for that in other areas.
|
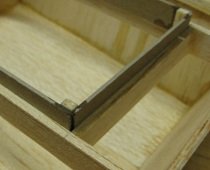
The coaming is made from 1mm Fiber Board, but could just as well be made from hard balsa, basswood, plywood or styrene. I had the fiber board laying around and figured I'll give it a try.
I was impressed with the board and it glues much better with CA glue than plywood or most hardwoods. And it is readily available and very inexpensive.
I cut a couple of strips 1/2 inch wide by 24 inches long (the size of the sheet). I then trimmed them to length. I held them in place protruding 1/4 inch above the upper edge of the deck stringers, and glued in place.
To support the corners, I added scrap pieces of balsa from the inside in all four corners (see picture above). All in all, it turned out great. To the point I'm considering planking my next project with Fiber Board. I will use it again later for the deck houses of the PT-109.
|
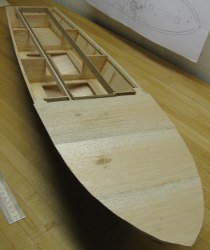
Laying the Deck
Time to lay the deck. I used 1/16 inch balsa here as well, just as I did for the hull planking. This is the thinnest I'd go - in hindsight I think 3/32 (2.5mm) would have been better. The benefit of going thinner is obviously lighter weight, but it is also rather delicate.
It can also depend on the hardness of the balsa at hand. Being the incurable Cheapskate, I order mine online at a significant discount. The problem is, I can't pick and choose hardness as I please.
|
I start the deck laying by cutting a few pieces to length. I don't really measure, just laying the long sheet in place and holding it with my thumb where I need to cut. I then cut it a tad bit longer.
Next I always dry fit. Since there isn't much of a second chance with CA glue, I try my best to get it right the first time.
Up until now it's been fairly easy to "tack" pieces together and flood with CA glue after the fact. That's about to end. The front end of the PT boat is especially difficult to get into after it's sealed up.
After I'm confident all is well, I spread glue on the bulkheads and stringers. I try and work as fast as I can since the CA glue wicks into the balsa fairly rapidly.
Subsequent sheets (as I'm moving towards the stem) follow the same idea, making sure I dry fit first and trim with razor blade as needed. I also make sure I apply glue to the joint between the sheets.
|
The sides, on either side of the hatch coaming is best done by cutting a perfectly square cut, so one edge lines up really close to the previously laid sheet, while one edge fits snugly to the hatch coaming.
At this point there is only one piece left between the transom and rear hatch coaming. Here it is best to add a couple of scrap pieces of balsa on the inside of the deck stringers. Otherwise the last deck sheet has no structure to lay on and it will be very difficult to lay it flush with the rest of the deck. I wish I'd taken a picture, oh well.
Finishing the Keel
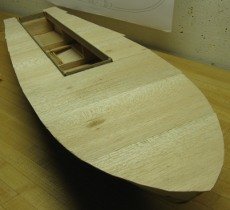
I wanted to add a stick of hardwood going down the ridge of the keel. I opted for a 1/16 inch square strip of Basswood. I think Basswood is an optimal companion with balsa, because it is not too terribly hard. If a wood like maple or birch is used, it is too easy to gauge and "over sand" the balsa when trying to shape the harder wood.
|
Now the hull is ready for finish sanding with fine grit sand paper. At this stage the hull is "in-the-white", meaning ready for sealing and finishing. Balsa is unique in that regard as it is extremely porous. The trick to save on coats of dope (or lacquer) is to use the tested "tissue and dope" method.
Continue to Part Five: Superstructure and deck houses.
Recaps of the PT 109 model build:
Part one: Start of the PT 109 build.
Part two: Cutting out parts and framing the hull.
Part three: Planking the hull.


