PT 109 - RC PT Boat Build Log
Part Two
Want plans for this project? Get them at the Plan Store.
An Elco RC PT Boat project – Learn step-by-step how to scratch-build a semi scale radio controlled model PT 109 on a budget.
The RC PT boat hull will start to take shape in this installment. In part one, I cut out the structural parts. Here I'll focus on the assembly of these parts and preparation for the side planking.
For a recap of part one of this PT 109 build, follow this link.
|
Assembling the RC PT Boat Hull
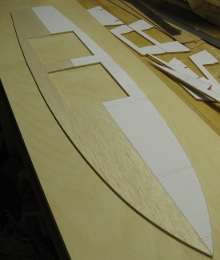
Let me say this first, it may be tempting to remove the paper templates at this point. Sort of like picking at a scab. Try and resist.
Instead, it is important to transfer lines such as bulkhead locations and center lines directly to the wood before removing the paper templates.
Let's start with an overview - these are the steps in this section:
- Assemble chin shelf halves
- Pre-assemble the false-keel-stem and the two foremost bulkheads
- Attach the bulkheads
- Attach transom
- Attach deck and shear stringers to the bulkheads
- Sanding and preparing to plank the sides
Assemble Chine Shelf
At this point, it's important that the surface underneath is flat. How flat? Well, I had a 3/4" plywood board with a 1/16" bias in it over a three foot length. That I deemed "flat enough".
The most important is to stay away from any building surface with a twist in it. If there is a bow or bias side to side or front to back - nobody will ever know.
A twisted board will transfer into the hull and could ruin the entire RC PT boat project. Similarly, avoid material that are twisted, especially for early assemblies like the frame.
|
I laid the two halves out side-by-side, center line to center line, and face down. After lining them up so stem and stern were even from side to side I taped the two halves together. Three pieces of tape - front, middle and rear. 100% line-to-line fit is not necessary. I had a gap about 1/32" (almost 1mm).
I used packing tape, because that's what I had handy. I can imagine masking tape works well too.
|
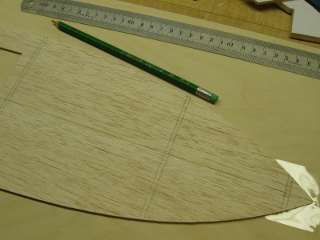
Next I carefully flipped the chine shelf over. One half now still have the paper template attached. With a sharp pencil and a straight-edge, I extend the bulkhead location to the opposite half (onto the balsa). Once all stations were marked, I removed the paper template.
I'm a bit anal sometimes, so I extended the pencil lines across both halves. This isn't really necessary.
|
At this point I placed a few weights along the length of the assembly to hold the balsa to the work surface. Then I took some CA glue and placed a few drops along the joint. No need to go too crazy yet with the glue.
Before beginning work on the bulkheads all center lines need to be transferred to the balsa. A square comes in real handy here. Once that's all done I removed the paper templates.
Next I dry-fit the stem piece and two foremost bulkheads together and placed them on a flat surface to check it. It seems to never fail, but it didn't sit quite flat. The best way to fix it is to extent the slots that interlock the three pieces just a fraction and go back and forth - fit again etc.
After a little fiddling it sat flat. At this point I lined up the foremost bulkhead in it's position (taking care it was centered) and placed a small amount of CA glue on either side -left and right. Just enough glue to secure it, but no more than what I feel I can recover from if I change my mind.
Once happy I gave the stem piece and second bulkhead the same treatment.
|
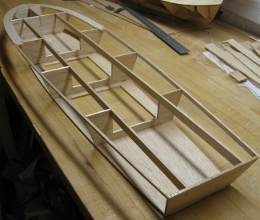
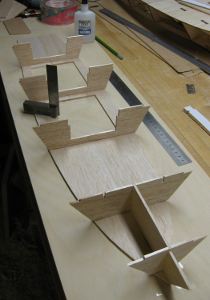
I then moved along attaching the third, fourth etc. checking perpendicularity and position carefully before committing with the CA glue.
Once all the bulkheads were in place it was time for the transom, shear and deck stringers.
Deck Stringers
The deck stringers are 1/8" x 1/2" strip of balsa, cut from a sheet. First I cut them a few inches too long and dry fit them. I figured they can protrude passed the second bulkhead without hurting anything.
Since the transom is at an angle it is important to have the deck stringers overshoot the chine shelf by a couple of inches. I attached them with a light dab of CA glue.
RC PT Boat Transom
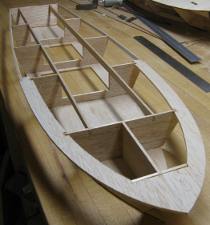
Next the transom was attached. As mentioned, it is supposed to be angled outward towards the rear. There wasn't much to go by, so I eye-balled it in place. I lined up the upper edge until flush with the upper edge of the deck stringers, and the lower edge lined up with the chine shelf. A dab of glue - it seems to have worked out well enough.
After the glue was set, I inspected my work so far. It looked alright. Next I flooded each joint with enough CA glue to wick in any gaps. Balsa is very forgiving in that the CA wicks well and cures quickly.
This is a good point to let the assembly rest for a while to ensure all the glue cures. This has two advantages:
- It is unlikely to come apart
- I'm unlikely to accidentally glue myself to the PT boat
Shear Stringers
Next I turned my attention to the shear stringer that defines the deck outline of the first third of the boat. These turned out to be a bit tricky mainly because (as it turned out) the foremost bulkhead was not perpendicular to the center line. Oh well.
I was confident the stem piece was on center, so I let that guide me. I also let symmetry take priority. I figured, if I mess up and do it equally on both sides it'll look intentional.
|
So it took a little fiddling around until I got it right. The other thing that makes this step a challenge is the sweep of this part of the deck. While trying to position these stringers, I had to bend them in place.
Here is a tip: Whenever a left and a right hand part is to be bent in place, it is best to attach both sides simultaneously. It may seem like you don't have enough hands sometimes, but the benefits are definitely worth considering. The forces induced act symmetrically on the assembly and balance out, thus avoiding the assembly to warp. The next best thing is to alternate right - left. This approach is often more practical.
The way I did it was by attaching them (lined up symmetrically) in the stem and fixing them as usual with a dab of glue. After closer inspection, I again applied a generous amount of CA to secure them. Again, I let the assembly sit for a while.
Since the bending will induce stress in the rest of the assembly, I placed some weights on the chine shelf assembly to hold it down flat on the work surface.
Next, I attached them by pushing down on both stringers with one hand and applying glue with the other.
|
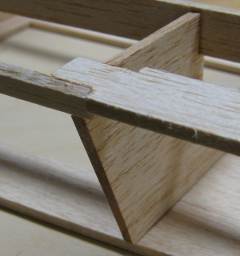
The last stringer was along the shear line from transom up to third bulkhead. The bulkheads should be prepped for the stringer to sit flush and even to the outside edge of the bulkheads.
This is easily done with a razor blade or X-acto knife. I had to go easy and dry fit again and again until I got it. The trickiest part was where this stringer meets the one already in place at bulkhead #3. See the pictures above.
Preparing for Hull Planking: Sanding and Trimming
I don't know of a single individual that doesn't hate to sand, it's like a law of nature. I'm no different. Having said that, it's an import step that requires patience and attention to detail.
The RC PT boat hull will be planked with a skin of 1/16-inch balsa. It may be tempting to cut a corner here and half-fast the sanding step, but believe me, you'll suffer for it later.
The balsa is thin enough to show through a lot of imperfections if not properly dealt with in this step. So, you may ask, why not use thicker planking material? Well, it may work.
I don't think 3/32 inch thick would be an issue. 1/8 inch may be pushing it. The benefits including more material, thus less risk sanding through, and less prone to show bumps etc. The cons: more difficult to bend, and a heavier boat.
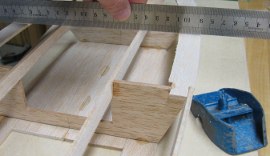
First the deck stringers has to be taken down to the shape of the deck sweep. I used a hobby plane for this (see picture below) and a metal scale. I took a few strokes with the plane and checked my progress from side to side.
|
In this step it is important not to go too fast, and to hold the plane horizontal. Otherwise you run the risk of knocking out bulkhead #3 completely. Slow and steady does it.
It is also better to stop too soon and finish up with a long sanding block. 80 or 120 grit does the trick.
Next I trimmed the deck stringers flush with the transom and bulkhead #2.
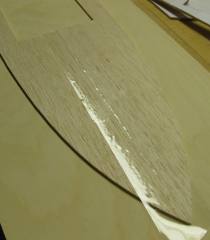
For the sides, all high spots need to be taken down and the bulkheads being given an appropriate taper for the balsa skin to sit flat against. This is difficult to describe, so take a look at the picture below.
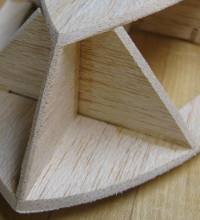
|
As you can see on the picture, I took good care to make sure the stem support piece (on the hull center line) is evenly tapered to the left and right.
When sanding balsa, you have to be careful not to take too much. A few light strokes and checking your progress is the best approach.
Go back to Part One of the RC PT 109 build
Continue to Part Three of the Elco RC PT Boat build


