Make a Model Boat Rudder from Brass
Find out how to make an RC model boat rudder from brass. The rudder in this "how-to" was made for the Lindberg North Sea Trawler model that I'm converting into a radio controlled boat.
The model boat rudder I was making in this write-up is quite small to fit the 17-inch (appx. 430mm) Lindberg Trawler. I see no reason this exact same method could not be scaled up to model boats twice the size if that's what you need.
|
The biggest problem in making a working rudder for a model boat this small is how to attach the thin rudder stock to the blade. Commercial rudders I've seen have all been considerably larger. They all have a slit cut at the bottom of the rudder stock where the blade has been inserted. The assembly has then either been soldered or riveted together. In both cases yielding a very strong and durable connection.
In my case, the rudder stock is a brass rod only 1/16 inch (1.6mm) in diameter, and the blade is .025 inches (0.4mm) brass sheet. My first thought was to mimic the commercial rudders, but quickly ruled it out due to the delicate saw and fixture I would need in order to cut a slit down the middle of the 1/16 inch brass rod.
Another idea was to simply file a flat on the brass rod, lay it on the side of the rudder blade and solder it. In order for the blade to stay on center of the stock, I would have to file passed center. That would have meant the remaining tongue of the rod would be insanely thin. Too thin to provide any hint of a rigid support.
My last idea was the one I went with. I would file an angled groove into the rudder blade that would fit the diameter of the rod. The rod would be laid in and soldered onto the blade at a shallow angle (about 5 degrees). I would then bend the rudder stock to align with the rudder blade as close to the top of the blade as possible. This idea seemed easy enough to pursue with the tools I have and sturdy enough to stand up to the usual abuse an RC boat typically gets.
Tools to Make the Model Boat Rudder
|
|
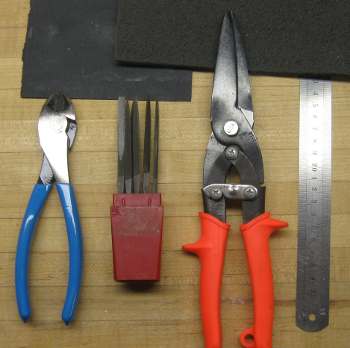
The tools I used were:
- A pair of pliers to cut the brass rod
- Needle file set
- A razor saw to cut the tubing
- Shears able to cut fine gauge, medium hard brass sheet
- A scale
- Abrasives: 220 grit sandpaper and a Scotch Brite pad
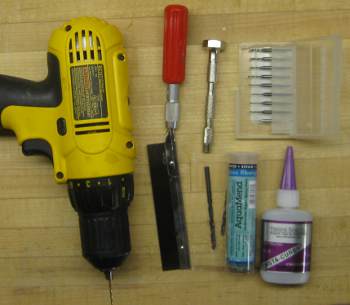
- A drill motor
- Drill bits
Glue etc.:
- CA glue
- Epoxy putty
|
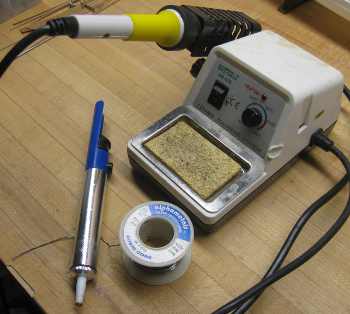
- My trusted solder station. Here is a good solder station
alternative.
- 60/40 Lead/Tin solder
- Flux (not shown)
- The solder sucker
As a note I'd like to mention that these were tools I had at hand. It's entirely possible there are better or at least equally well suited tools I don't have, so use your judgement and try and improvise with what you've got. I don't recall actually using the solder sucker. It's just a handy tool to have available in case you do need it.
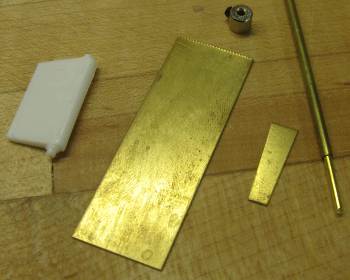
Materials for the Model Boat Rudder
|
- Rudder blade: .25 inch (0.4mm) brass strip
- Rudder Stock: 1/16 inch brass rod
- Rudder stock tube: 3/32 inch round brass tube
- Rudder arm: A piece of .25 inch (0.4mm) brass sheet scrap.
- Rudder arm clamp: Plated 1/16 inch wheel collar
for RC airplanes.
How to Make the Model Boat Rudder
Here are the steps to make the brass rudder:
|
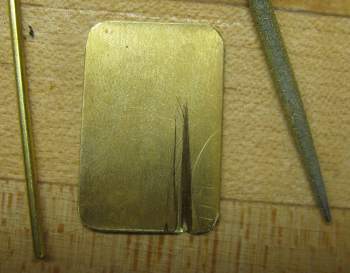
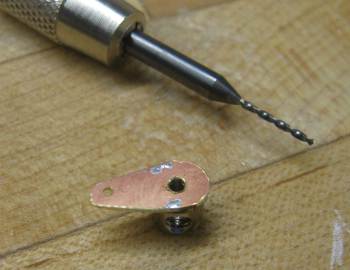
First step is to cut the brass sheet to rough shape. It is best to leave it slightly over-size. It's easier to fine tune the shape later than solder the rudder stock in the perfect location.
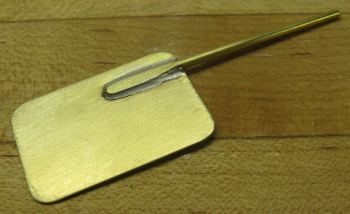
Next use the rat-tail needle file to file a groove at an angle in the brass rudder blade. The shallower the angle the better without cutting the blade in half. The aim is to have the rudder post intersecting the upper edge of the rudder blade at half it's thickness. This way, when the rudder stock is bent to be inline with the blade, the center-line of the stock will be in the center plane of the blade.
My rat-tail file is thicker than the brass rod I used for the ruder post, so I ended up using other shape files first and finish with the tapered tip of the rat-tail to get a good fit between the groove and the brass rod.
|
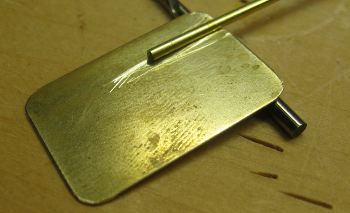
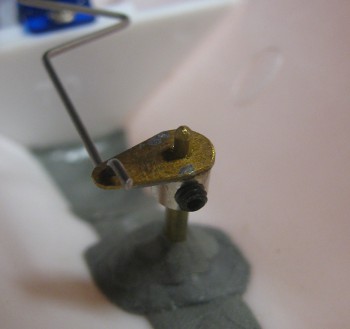
Next the two pieces needs to be soldered together. The pieces need to be laid in place so the solder can solidify without movement. I propped the assembly up with a 4mm drill bit.

|
The angle between the two pieces is kept shallow to permit as large of a contact area between the two pieces as possible. If you can make the rod come to half the height of the rudder blade, that's great - just be careful not to bend the "tab". Another benefit to a shallow angle is that the less the rudder post needs to be bent to get inline with the rudder, the better.
|
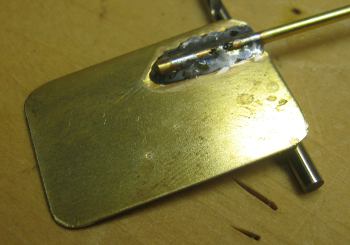
Before final assembly, use a Scotch Brite pad to clean up the rod and the area around the groove on the blade. I applied a modest amount of plumber's flux in the joint to be soldered. Apply generous heat and let the solder flow out. Try not to inhale the fumes.
|
Next is clean-up. I used various needle files for this. I used the rat-tail (round) to clean up around the rod and the flat file to thin the assembly, mostly by thinning down the post as it blends with the blade.
|
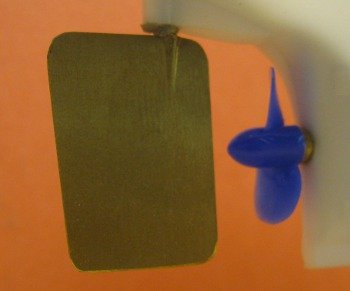
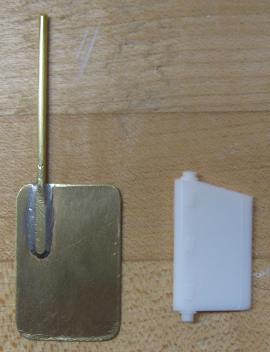
Next I bent the rudder stock to align with the center plane of the rudder blade. Now the rudder is done, barring final shaping of the blade. We'll leave that for last.
First I had to make a rudder arm.
How to Make the Rudder Arm for the Model Boat Rudder
|
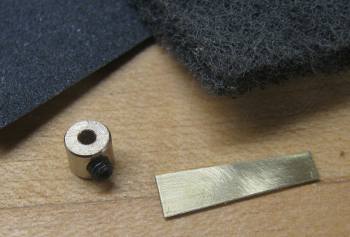
First step to make the rudder arm is to sand the nickel plating off the wheel collar or else the solder won't stick. One of the flat sides need to have all plating removed and it's good to remove the plating off the chamfer adjacent to it. I used 220 grit sandpaper and the Scotch Brite pad.
I used a scrap piece of brass sheet from the brass rudder I just made. It was curled up from being sheared so I had to flatten it and rough in the shape. Leave it big at this stage - slightly wider than the wheel collar and enough length to make it 25% longer than the servo arm you're planning on using.
|
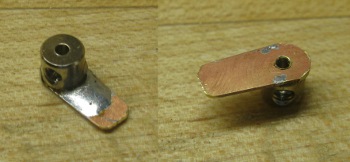
Before soldering, try and plan out which direction is best to aim the set screw that holds the rudder arm to the rudder stock. I opted to have the screw access toward the stern with the arm pointing to port. Once that's figured out, solder in place.
|
Next run a drill through the wheel collar the same diameter as the rudder post - 1/16 inch in my case - through the sheet brass. You also need a hole for the rudder linkage. I used a drill close to the hole size in the servo arm. Turned out to be close to 1mm. If you want, a row of holes can be drilled for more options later. Finally, shape the outside perimeter of the arm.
|
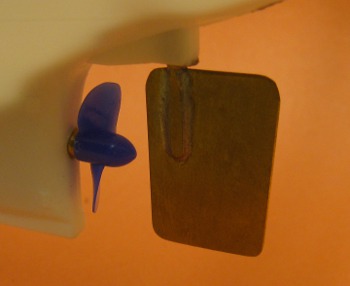
Now the length of the rudder tube needs to be worked out. This tube needs to be long enough to reach from the entry point into the hull and a small distance above the waterline. This way water is unlikely to seep in. It can't be too long either as the rudder horn needs some vertical space and the servo linkage needs to go below deck level.
I enlarged the existing rudder entry hole in the hull to fit the tubing I had chosen. Next I dry-fitted the tube and trimmed to length. In the process I also roughed up the end to be glued with the Scotch Brite pad.
To get the rudder tube aligned, I put the rudder stock inside the tube and aligned the rudder itself to the hull. Once I was happy with the alignment, I placed a dab of thick CA glue on the inside of the hull, taking care not to get any glue on the rudder or rudder stock.
Once the assembly was secured, I mixed and placed a blob of epoxy putty around the lower end of the tube on the inside of the hull for added support.
|
The last thing to do was to finalize the shape of the brass model boat rudder. It took a little back-and-fourth, but I'm pleased with the result. I did it entirely by eye trying to make sure I kept the blade above the keel and not over-hanging the stern by too much. It is also good practice to keep the blade area somewhat larger than "scale" and to let it protrude slightly forward of the rudder stock.
This is not the only way to make a model boat rudder, but I highly recommend it for smaller builds such as many plastic-kit-to-RC-conversions. In that regard, the Lindberg Trawler


