RC Boat Hull - Adding Details
Want plans for this project? Get them at the Plan Store.
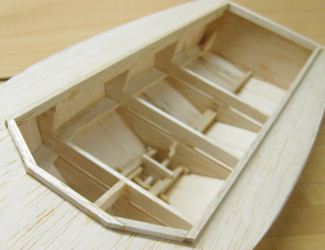
The RC Boat Hull will have the deck finished, a keel strip, hatch coaming, skeg, rub and spray rails installed.
The devil's in the details rings true even for RC boat hulls. Here we'll add some of those so we can move onto the rudder installation.
Stern Deck Filler
Attach a stern deck filler, for lack of a better term. Its purpose is essentially to push the superstructure slightly forward from the transom. It's not totally necessary, but I felt it'll look better.
It's made from a piece of 1/8" x 3/8" (3 x 10mm) balsa strip trimmed to length.

Add a Coaming
A coaming is a raised edge that keeps water out. They also help locate the hatch. I made mine from strip balsa 1/8" x 1/4" (3mm x 6mm), but the height is not critical. I glued it in about 1/8" (3mm) proud of the deck.
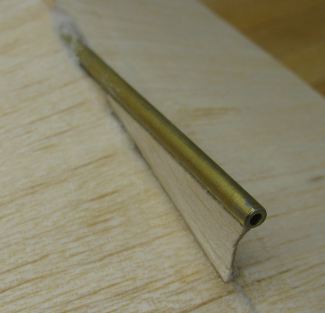
Propeller Shaft and Skeg
The stuffing tube and propeller shaft I intended for this model is identical to the one used on the lindberg trawler. An M2 commercial unit may work just as well. I glued it into the tunnel made earlier through the keel. Pay attention to final location as you need to make room for the rudder just behind.
Also check for alignment from side to side before committing.

For the skeg a 1/8" piece of scrap balsa were cut into a wedge and left long.

On the picture below you'll see the scalloped trailing edge of the skeg. It could be left straight, but I liked the slight arch.

For final shape the skeg was sanded both in profile and thinned toward the propeller.
Keel Strip
Until now the planking along the keel has been left open, and it looks pretty ugly. There are several ways to address, but my favorite is to glue in a strip of basswood for additional reinforcement.
The gap at this point is an uneven "V" where the actual angle varies along the length. First thing to do is to square it up by running a square needle file up and down the joint.

As I file the groove, I dry-fit with a 1/16" (1.5mm) square basswood stick. In the picture below you'll see it glued in place.
In the same picture, note how the upper edge of the hull planking (closest to the table top) has a flat sanded to accommodate the rub rail which will be fitted next.

Rub Rail
The rub rail consist of a 1/16 x 1/8 inch (1.5 x 3 mm) strip of basswood, although most any hardwood strip of similar size will work. It can even be made from styrene or laminated layers of card stock - your choice. Be sure to sand a flat surface on the upper edge of the hull planking, perpendicular to the deck. This surface should be as wide (vertically) as the strip is tall - in my case 1/8" (3 mm).

I glued them on one at a time, starting with from the stern, the starboard strip (right hand side) was glued in place first, as shown in the picture above. Joining the strips at the stem can be tricky, but here is a tip.
Intuitively, most builders would aim for making a joint between the starboard and port side strips, down the center line of the hull. This is not ideal for several reasons: First, it's hard to do. Second, the strip is the most likely to take a bump straight from the front and thus will see the most shock load right where the joint is.
A better way is as illustrated.

After the first strip is attached it is trimmed and sanded to blend with the surface where the second strip is meant to go. This way you'll end up with a joint that is a lot stronger and is off-set from the center line and therefore less likely to take a direct hit when you bump into the dock of other obstacles.

The second strip is also glued from the stern and gradually attached with CA glue as I progress forward. I tried to make sure the strip is flush with the deck as I went along.
Once at the stem, just continue the laying the strip passed the opposite side a fair bit.

Above is the final joint before sanding a more rounded shape.
Spray Rail
The last thing to do before we move onto the rudder is to add a spray rail. I wouldn't call it mandatory, but I believe it helps performance a little and it certainly makes the boat look a lot better.
It's made from 1/16" (1.5 mm) square basswood strip. Again, a lot of materials could be used, even hard balsa.
Attaching it is pretty straight forward. Starting from the transom and work your way forward along the chine knee. At some point the knee will be less defined and you need to establish the curve more or less by eye.
When I got to this point I took aim for an imaginary point at the stem where I felt the strip made a curve that I liked and simply followed with the CA glue. I'm sure there is a more scientific approach, but this worked well enough for me.
I should point out that my spray strips ended up slightly off comparing left to right, but I doubt anyone will ever notice. Below is a picture of how it ended up.

Another thing I'd like to point out is that I did the tissue-and-dope before adding the rub rail and spray strips. The CA glue has a hard time adhering to the dense and hard lacquer finish, so I contemplated gluing the strips first and then doing the tissue-dope.
After some valuable feedback (thanks Mike!), I'm back to the order presented here. Adding tissue after the rails isn't just going to be a challenge getting the tissue to conform to the rails, it will also shrink and pull away creating blisters where the planking meets the rails - so, bad idea.
I overcame the adherence issue by using baking soda as a combined kicker/filler and a lot of patience. I still ended up with a fair share of CA on my hands, but the result feels solid, so I think it was worth it.
Next, we make a motor mount...


