Tissue and Dope
Tissue and Dope is a tested and true way to seal balsa model boat hulls while adding strength. This how-to gives step-by-step instruction for sealing balsa with rice paper and cellulose lacquer.
Tissue and Dope serves two purposes:
- Seal a porous wood surface
- Create a hard shell resistant to impact
The technique has become my method of choice when sealing just about every type of wood hull where the hull is to be painted. The method used to be so common in model building that nobody bothered to properly document the process.

To be specific, there really is more than one method, and there are variations of the method that applies better to airplane wings than boats. On this page we'll stick with boats.
There is a wet and a dry method. The wet involves misting water that shrink the tissue, and in doing so stretching taut over the structure beneath. I don't use this method, simply because taut means the tissue will stretch away from the hull if there are concave sections in the hull.
Concave surfaces are not always immediately apparent, even when sections appear straight-sided, such as on hard chine hulls. I've solved this by avoiding the wet method all together, and stick with applying the tissue dry.My curiosity may drive me to revisit the wet method at some later date.
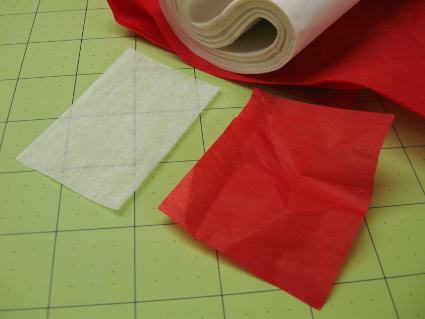
There are two types of "tissue" that I've worked with lately. Regular tissue paper (the red paper to the right in the picture above) and Silkspan (white/translucent above). Each is described below.
Tissue Paper
Tissue paper or rice paper. It is a relatively common material in the USA, mainly used for gift wrapping and crafts. The brightly colored tissue paper comes in two varieties. One made with waterproof dye and the other will bleed if wet with water. Neither will bleed with dope, so either will work fine for our purposes.
If you’re thinking of doing a lot of models, and want to stock up, consider getting a bulk pack from Uline or Xpedx. What you’re looking for is "gift grade tissue paper". They sell another product as "tissue paper" for wrapping breakable things, but it’s more like news print. While this paper may still work, it’s completely different and I’ve never tried it.
Most of the tissue paper you’ll see comes in all kinds of bright colors. This may seem completely frivolous and unnecessary, but as I've found, it can be quite handy. As you lay alternating layers in contrasting colors it will be quite apparent if you've missed a spot. Also, later in the process, as you start the sanding process you'll be able to tell when you're getting deep into the layers.
Silkspan
Silkspan is an interesting material that resembles the paper that tea bags are made of. It is less "crinkly" than tissue paper, about twice as thick and seems less prone to leave wrinkles and air pockets than the regular tissue. To the touch, it gives a sense of fine non-woven fabric rather than paper.
All told, I prefer Silkspan over regular tissue paper, not least because I save time in laying half the amount of layers that I otherwise would.
The downside is price. Silkspan is quite a bit more expensive than tissue paper, but I think it's well worth it considering the benefits.
There are several "weights" of silkspan. For boats I see no benefit in using the thin material at all. Any weight saving is marginal.
Dope
The proper name for dope is Nitrocellulose Lacquer. It has been around since the 1920 in industrial and commercial form. It is best dissolved with lacquer thinner. Both can be bought in many hobby stores, but chances are you’ll get more for your money if you go to a home improvement, hardware or paint store.
Lacquer also comes in spray cans ("rattle cans") which is nice for those final streak-free coats. There is also "Brushing Lacquer" vs. just "Lacquer". The former is supposed to dry slower to allow for more time to apply.
 and thinner commercial examples photo")
The biggest benefit with Lacquer over any other clear coat is that each layer fuses together with the previous, forming a solid entity. This makes for a more durable and strong coat than just about any other comparable material.
A word of caution: Lacquer and Lacquer Thinner contain volatile chemicals and should only be used away from open flames and with ample ventilation. I only use it outdoors.
Cut the Dope
When you buy dope at the store it is too thick to use as is. I always dilute it about two parts lacquer thinner with one part dope. Thicker dope will build up faster, but won't penetrate into the wood very well. It also tends to go on uneven.
I buy the Minwax brand Clear Brushing Lacquer from my home improvement store. I then poor some into a washed glass jar. I like those with wide openings as they easily accommodate a 2" wide brush.
Speaking of brushes, I use disposable brushes. I can get a brush to survive a few days as I go through the steps by keeping it in a ziploc freezer bag when not in use.
The Process
Here is a somewhat simplified description of the tissue-and-dope method I use.
1. Sand
Start by sanding the hull smooth. For balsa and basswood I generally use 80 or 120 grit. At this stage I don't bother sanding any finer than that as the first coats of dope will make the grain raise and thus roughen the surface anyways.
2. Coat With Dope
Using the diluted dope I apply several coats with a brush. Balsa requires at least three coats, preferably a couple more than that. For Basswood, three is plenty most times.

You should be able to tell when you have built up enough of a coat on the wood. Above is a picture of a rudder made of basswood. It has received three coats of the diluted dope. As you can see in the picture, a subtle sheen has appeared (most noticeable on the lower corner closest to the camera). The surface of this rudder is ready for the next step.
3. Sand Again
Time to sand one more time. The first coats of lacquer has made the fibers on the surface of the wood to raise up. They are now easily removed by a second round of sanding.
This time I use a relatively fine-grit sandpaper: #220 in this instance, and go easy. I sand until the surface is smooth to the touch.
4. One More Coat of Dope
So far we've saturated the wood and removed the surface fibers. Next we apply one more coat of dope. This layer will become the coat that actually adhere the tissue to the wood. If applied in a smooth and even layer, once dry, you're ready for the next step.
5. Attach the Tissue
Pour some lacquer thinner in a glass or metal container. I like to use used glass jars with lids for convenience. Don't use plastic containers as the thinner can be very aggressive and dissolve them.
Cut out tissue in a desirable size.
While laying the tissue on the prepared surface and wet the entire surface with thinner. I use a clean brush for this that I dip in the jar. You typically only need to touch the tissue lightly and move across the surface, as the thinner will wick into and across the tissue on it's own.
6. Dope, Sand and Paint
Once the tissue is down you can start building up layers of dope. It can take many layers, but again, you'll eventually see the paper completely saturated and a shiny top coat starting to build up.
Once it's shiny you can lightly sand with 150-220 grit sandpaper between coats to keep it smooth. I usually apply a couple of coats at the end without sanding. At this point it's a good idea to let the model rest for a while and let the lacquer cure. Give it at least a week, but up to four is even better. The surface will fully harden and most of the thinner will evaporate leaving a hard surface ready for paint.
Before painting I sand again lightly and apply a couple of coats of automotive primer and finally apply my top coat. Some builders apply clear varnish as a final coat, buy I rarely do.


