Model Boat Propeller Shaft
Build a model boat propeller shaft from scratch using relatively common tools and materials for converting a plastic kit to RC.
A model boat propeller shaft isn't normally something I'd build from scratch. For most model boats installing your standard M4 shaft is really no issue. For the Lindberg Trawler it was a little different.
|
Researching Model Boat Propeller Shafts
The hull is only 17 inches (about 430mm) long and the propeller is barely an inch in diameter. This is clearly outside the standard sizes I normally would deal with, but I'm starting to like it because component and material cost is way down. With strides made in lightweight RC gear and increased power density in modern batteries, it is not as challenging as it used to be.
Doing a little research online, it seems quite a few enthusiasts have converted plastic kits to RC. The kits by Lindberg are especially attractive because many of them are a pretty good size for a plastic kit and this Trawler is no exception.
I found a few conversions, and some of the materials used included plastic tubing for stuffing tubes, bike spokes for shafts and most reused the propeller supplied with the kit.
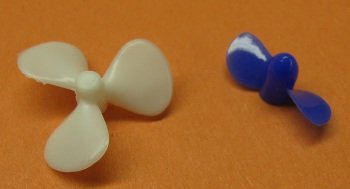
Out of the three, I had the biggest issue with using the propeller that came with the kit. As you probably know, polystyrene doesn't have very many good qualities as an engineering material. It's mostly used in plastic kits because it's cheap.
In addition, there is no hole drilled in the hub of the propeller that comes with the kit and I can't see myself lucky enough to drill straight enough to get a propeller that doesn't wobble. Add to that, the appearance of this prop is not the best.
I wasn't too thrilled with any of the other solutions either, so I decided to focus on solving the prop issue and work the whole model boat propeller shaft issue from that end.
|
Locating a Suitable Propeller
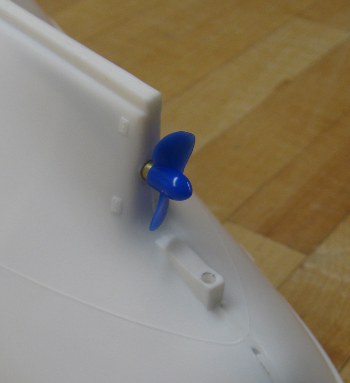
I searched high and low for a propeller and finally found the Submarine Motor by Tamiya. The submarine Motor is a bit of a misnomer, it has nothing to do with submarines.
It's really an appendix-motor that can turn a toy boat or plastic model into a simple motorized toy for the bathtub or pool. It consists of an encapsulated battery, electric motor and an integrated rudder. The motor is pretty much junk, so for our purposes we'll only use the propeller. For the record, there are other brands, such as the Playmobil Underwater motor. More than likely, the other brands will work too.
The propeller is pressed on directly onto the motor shaft. The motor supplied is a very low voltage Mabuchi motor, as it needs to be able to run on a single AA battery.
The propeller is pressed directly onto the motor shaft, so I started hunting for suitable stainless steel wire. The wire needed has to be straightened and to the correct diameter, which turned out to be a challenge to find.
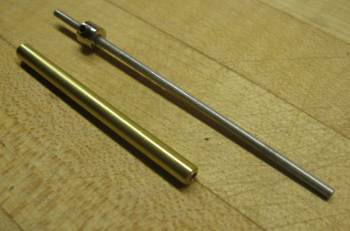
Shaft Material
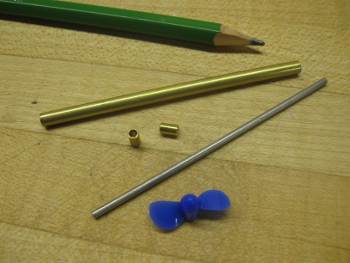
I found the shaft material at Amazon Industrial & Scientific. The motor shaft is 2mm, and the wire I found is 0.0781 inches which is plenty close enough. It looks and feels a lot like piano wire, except it's stainless.
Stuffing Tube Material
Next I needed a suitable pieces of tubing for the stuffing box. I opted for regular old brass hobby tubing from K&S Engineering. It appears they have managed to capture a large part of the world market of hobby metals.
For bushings in either end, I got some 2mm inner diameter, by 2.5mm outer diameter. For the outer tube I used 2.5mm inner by 3mm outer diameter. All tubing were cut to size with an X-acto razor saw.
A rule of thumb when it comes to the length of plain bushings is to make it one to two times the shaft diameter. In this case it's more a question of how short a bushing you can handle. I'm not sure exactly what the final length was, but probably at the higher end of the "rule-of-thumb".
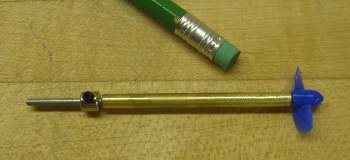
The length of the stuffing box was tricky to estimate, but ended up about 2 1/8 inches long (about 55mm). The stainless shaft is best cut with pliers.
The last piece I had to get for the assembly was a wheel collar as used for RC airplanes. It acts as a stop on the inside so the shaft doesn't fall off. I found mine on ebay. I couldn't find 2mm ID, so I settled for 1/16 inch and drilled it out.
|
Assembling the Model Boat Propeller Shaft
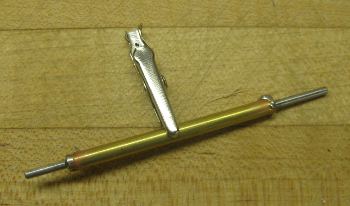
Next it was time for assembly. It is a good idea to place flux on the joint to be soldered. I had plenty of plumber's flux from a home improvement project a while back, so that's what I used.
I used an alligator clip to prevent the tube from rolling off the table. I then threaded the first bushing, the outer tube, and second busting on the shaft and pushed the bushings into the tube from either end.
It may be tempting to just assemble the tube and bushings. By including the shaft, it will help better align the two bushings to each other. Also, I made sure the bushings were slightly proud of the outer tube so I had material to trim them flush later.
Next I heated up the tube around each bushing and applied regular 60/40 tin/lead solder into the joint. I kept an eye on it and tried to watch for the solder being "sucked" into the joint by capillary forces. Once that happened, I applied another glob, just to make sure the joint wasn't starved.
There are now lead-free products that work quite well. I just happen to have a large spool of the old stuff I'm getting through.
The solder iron or station doesn't have to anything fancy. I reckon 25W is sufficient, maybe even 15. This is pretty piddly stuff, so it shouldn't be that difficult to heat up.
|
Cleaning Up the Model Boat Propeller Shaft
Next came cleanup. I used a small file that is part of my needle-file kit. It shaves the solder very easily. I filed from the middle of the tube and out towards the ends until all excess solder was gone off the surface of the brass. Next, I trimmed the ends and finished with a Scotch Brite pad.
|
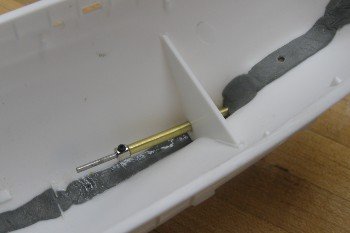
Below are a couple of pictures of the propeller shaft fitted in the model boat.
|
The shaft was later permanently attached with CA glue.
|
Keeping Water Out of the Propeller Shaft
Before the propeller shaft is ready for service, it needs to be filled with grease. Most model boat builders use Vaseline because it's relatively light grease and the easiest to come by.
If you're looking for alternatives, be aware there are types of grease that don't work well in contact with water. One such grease is automotive wheel bearing grease. Also try to avoid grease that is too thick as it will pose drag on the motor.
The easiest way to get the grease into the stuffing tube is to use a syringe and inject the grease into the tube from the propeller end.
It is worth noting that the entire tube does not need to be filled. 1/3 to half is perfectly adequate. If filled to the rim, friction will increase unnecessarily and cause more drag on the motor.
Return from Model Boat Propeller Shaft to Radio Controlled Boats


