Model Boat Hull Construction
The Carved Block Method, Part One.
Model boat hull construction made easy – a step-by-step instruction how to build a wooden boat model hull from a solid block. The method described is common for ship model kits and scratch building.
Building a model boat hull using the carved solid block method can seem intimidating at first. It shouldn’t be though - if being methodical there is no reason a first attempt will not turn out as good as any.
The carved block model boat hull construction is best used for:
- Static ship models - up to 600mm (24 inches) long
- Making a pattern for resin or fiberglass hulls
- Making ship's boats ("life boats")
This method has disadvantages, such as:
- Hulls may crack - The risk is increased with large cross sections and the use of inproperly seasoned lumber.
- Limited use if natural wood finish is desired. This would require planking after the carving process is completed.
You'll need:
- A hull plan in the right scale with deck plan, profile and cross sections. It helps if the stations (where the cross sections are located along the hull) are marked on the other two views.
- A piece of wood as described below.
- Hand Tools: Carving tools, files, sandpaper. Hand plane if you are prepping your own wood block. A hand saw* of some kind to roughly shape the ends of the wood block.
- Drafting tools: Pencil, square and scale.
- Also helpful tools: A bandsaw is a good help, but not essential. *If you have access to one, you won't need the hand saw above.
Step 1: Select Model Boat Hull Material
Most model ship hulls built with this methods are made from either mahogany or basswood (linden in Europe), but there are many other suitable wood species, such as poplar and alder. For beginners, I’d recommend basswood or poplar because they are easy to carve and inexpensive.
For experienced woodworkers there is no reason cherry or walnut could not be used. If you have a favorite wood or a perfect scrap piece, you may as well use it.
The type of wood can always be negotiated as long as it is stable. I find it more important to select properly seasoned lumber, free of knots and pitch pockets.
Lumber I wouldn't use include oak, American beech, birch, hard maple, and exotic species like rosewood, teak, purpleheart and bloodwood. These species are hard to work with hand tools and dull edges quickly when carving.
This method is best used for models under two feet in length and under 6-8 inches wide. This off course is a loose rule that will vary with ship type etc. If you want to go bigger, consider the bread-and-butter method (also known as the laminated method) for saving in material and weight.
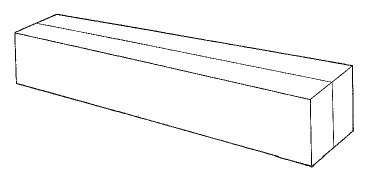
Step 2: Preparing the Wooden Block
Make sure the block is squared up, i.e. the long sides are square and parallel to each other and that the block is a quarter to half an inch longer than the finished hull (6-12mm).
|
With a pencil, mark a centerline down the middle of the block. An alternative way to achieve this is by gluing up two boards where the joint will become the center line. This works great as long as the boards are straight, without twist and properly surfaced before gluing.
Step 3: Mark the Stations, Profile and Deck outline
With a square to guide you, measure out and mark the stations. Photocopy or trace out the profile and deck outline onto separate pieces of paper. Cut them out with scissors to form templates.
Line up the deck template symmetrically on the centerline and align with the stations. Trace the deck outline with a pencil onto the block. Follow the same method for the profile template.
|
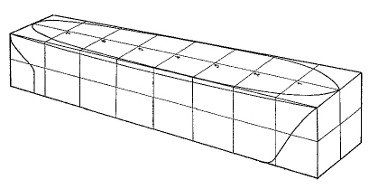
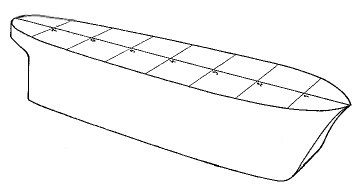
Step 4: Cut out Profile and Deck outline
A band saw will make your life a lot easier in this step, but are not essential. Begin by cutting out the profile. Then cut the deck outline.
|
Then cut the deck outline. Notice how the stations you so carefully marked got cut away. Use the square and pencil them in again.
Step 5: Make Station Templates
|
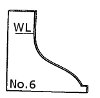
These are best made by photocopying or printing out the body sections onto card stock and then carefully cutting out with an X-acto knife.
Be sure to mark the water line and deck line. By making the template upper edge level with the deck line, you'll kill two birds with one stone. It’s also a good idea to put the station number on each so you can identify them easier.
Continue the Article Series Below
Part Two - shaping the hull and deck
Part Three - fitting keel, stem, sternpost and rudder
Part Four - planking the deck and fitting gunwales


