Model Boat Hull Construction
Solid Block Method - Part Four.
Model boat hull construction – solid block ship carving. We have come to the deck and gunwales – Tips on how to lay a wooden strip deck and fitting and attaching the gunwales.
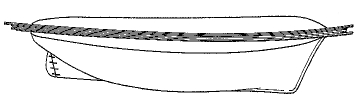
The model boat hull is almost finished. The block has been shaped and ready for the deck and gunwales.
Step 11: The Deck
The model boat hull should be ready for the deck. First, not all ships have wooden decks. Modern ships usually have painted steel decks. If that’s the case with the ship you’re building, you’re off the hook. Skip down to step 12.
If the model boat you are building has planked wooden decks, there are essentially four options:
1) Plank the deck with strips of thin wood
This is the preferred method to finish a wooden ship deck. Most ship decks are sun-bleached Teak wood, which has a distinctive whitish gray color. If you try and simulate the exact color, chances are the deck will look dirty on the finished model. The best wood species to use for this purpose are light in color and with fine grain. Common woods include basswood (linden), aspen, holly, white birch, pine etc.
The wood strips can be purchased from your hobby store, fabricated from match sticks or popsicle sticks. To simulate caulking each strip can have one edge painted with a tin coat of black paint. Some builders suggest using pencil lead to mark the edges. This may cause the lead to stain the deck when sanding smooth later, dulling the appearance. The best option is always to use scrapers rather than sandpaper whenever possible.
It is easier to lay a single strip along the length of the hull than short strips to simulate individual boards. On the model boat hull, mark the centerline and lay the first strip along the line. It can be challenging to hold the strips in place as the glue dries.
Slow curing CA (cyano-acrylate) glue can be used and let cure while the strip is held in place. Attach subsequent boards alternating port and starboard until the entire deck is covered. If dried glue prevents a tight fit between boards, use a scraper to remove the glue
2) Install pre-assembled ship decking
Pre-assembled ship decking can be purchased in sheets with varying plank widths. It can be a great time saver, however true scale aficionados believe the caulk lines are too wide. For the most part I’ll have to agree, it does save a ton of work though.
If you want to use pre-assembled ship decking for your model boat hull, skip forming the camber shape. Otherwise you run a great risk of having the decking sheet crack. Thin wood sheets don't like being bent in two axis simultaneously.
3) Leave as is – don’t mark individual boards at all
A good option on models of large ships at a small scale, is to not mark the individual boards at all. Last time I checked, plastic kits of WW1 and WW2 ships in 1:700 scale have this level of detail. Realize that if the board is 250mm (10 inches) in real life – a likely width for a deck plank of a battleship from either world war. At 1:500 the board represented on the model should be half a millimeter! Add to that, a 5mm caulk line is only ten micrometer (0.01 mm) wide at that same scale. A typical sheet of paper is 0.1mm, so it's pretty thin indeed.
4) Mark the boards with steel rule and pencil or ink
This method is sometimes recommended in vintage books on the subject of model ship building. It seems the model ship building community finally have agreed this method is one for the archives. I've added it here for completeness more than anything.
So far I have never been successful or happy with the result of a deck where the boards were drawn in. This is hard to do convincingly. It is too easy to get uneven thickness or not placing the rule parallel to the centerline. It always seems to end up looking smudgy or cheap (or both).
Step 12: Adding Gunwales
The gunwale is the part of the boat hull that protrudes above the main deck. It can be made from thin plywood, card stock or styrene sheet.
The traditional way to fit the gunwales is by cutting a rabbet along the deckline about 3mm (1/8 inch) tall and as deep as the thickness of the chosen material. It is a good idea to divide up the gunwale material in segments on model boat hulls with a more pronounced decklines. It will make the fitting a lot easier.
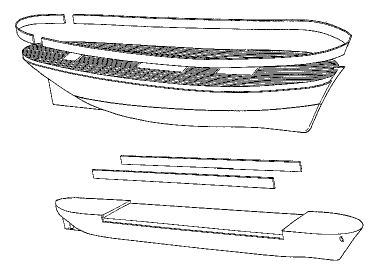
To transfer the shape from the hull to the final material, do a pencil rubbing by laying a piece of paper over the rabbet edge and go over it with a soft pencil. Then transfer the rubbing to your gunwale material. Leave enough height to be able to trim it down after assembly. Cut along the transferred edge, trim to length and glue in place.
Once attached, the upper edge needs trimming. Use a small spacer block, as high as the finished gunwale, and a pencil. Slide the block on the deck and mark with the pencil as you move along. Then carefully trim with an X-acto knife.
Cardboard may seem like a soft, weak and fuzzy material to use, but it is quite handy. It forms easily and is inexpensive. Once in place it can be stiffened by letting thin CA glue wick into the fibers. By treating it this way, the paper can be sanded and worked much the same way as polystyrene sheet.
Return to Part One - preparing the wood block
Return to Part Two - shaping the hull and deck
Return to Part Three - fitting keel, stem, sternpost and rudder


