Bread and Butter Hull Construction
Building a Bread and Butter hull - learn how to build a laminated model boat hull from glued up wooden boards. A step-by-step picture tutorial constructing an RC steam launch model from scratch.
If you want to build a Bread and Butter hull for your next model boat there isn't a whole lot of helpful information out there. You may find a page or so in a book about building model boats, but that's about it.
I wanted to fill that gap by building a hull and document my progress. In order to do that, first I had to find a suitable subject.
|
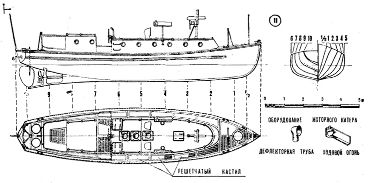
As I was browsing the Russian hobby magazine Modelist-Konstruktor (the No.11 1987, page 20) I found a ship plan for a motor launch for the Russian battleship Marat.
I liked the simplicity of it and decided to build a model boat based on that. This was to become a semi-scale model. As simple as it may look, there are still details I didn't feel like dealing with, such as the steering arrangement above deck and the deck grating.
|
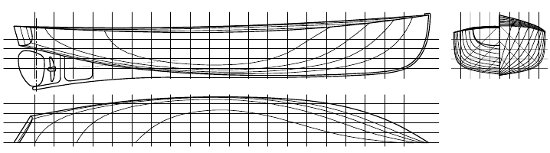
The plan I had was of poor resolution, so I had to refine it and true it up. Here is what I ended up with. I wanted to make the bread and butter hull from inexpensive wood and with enough laminates to illustrate the method well. To meet those goals I had to figure out what scale to build to.
- The dimensions of the motor launch (or pinnace):
- Length: 12.9m (42ft 4in)
- Beam: 2.8m (9ft 2in)
- Draught: 0.8m (2ft 8in)
- Displacement: 12.5 long tons
Using trial-and-error I eventually settled on 1:16 scale. The hull will end up 806mm (32in) long and weigh in at right around 3kg (6lbs). More importantly, I'll use ten layers of one-by (19mm thick = 3/4 inch) pine construction lumber I happen to have laying around. The width of the hull will end up at 175mm (just under 7 inches).
|
I had never built a bread and butter hull on the buttock lines before, but now I'm sold. For more on the pros and cons about bread-and-butter and direction of the lifts, follow the link.
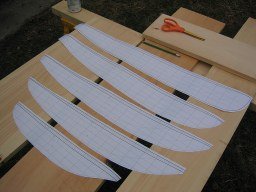
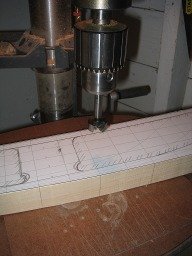
First I had five copies printed out of the shear plan (side view) with the buttocks lines shown. Each was then cut out. There is no need to be all neat about it - staying 3-6mm outside of each buttocks line is fine.
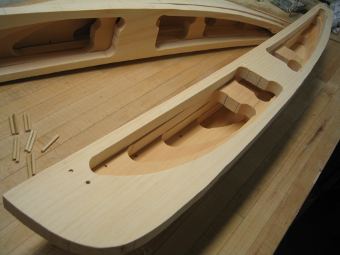
A typical bread and butter hull is carved with an open top and the deck constructed using deck beams, like you would on a real ship. I decided to divert from this idea and integrate the deck with the rest of the hull and cut it out later for cabins and hull access.
Part of my decision was to use the middle part of the deck (that would later be cut out) to attach a block of wood for holding the bread and butter hull temporarily as I was carving.
For the top (deck) I decided to stay above the highest point of the deck. This way the laminated stack would have the curved shape from stem to stern roughed in, but straight from side to side. This decision was also to make it easier to hold the hull while carving and shaping.
|
Next I attached the paper templates to the wood using 3M Scotch-Weld™ 75 Adhesive. This is a great product that is suitable for temporary positioning - perfect, that's what we're doing. Follow the directions on the spray can.
A note on picking out your wood. The laminates doesn't have to be perfectly flat, but use your flattest pieces in the middle. If a board is bent or cupped, if possible orient the left and right like mirror images so they pull in opposite directions and hopefully cancel each other out. Watch out for twisted boards - there is no fix.
Also, avoid knots - if they are in the middle of a cut out board, that's OK. You want to avoid having knots where the finished exterior of the hull will be. It is likely that the resin in the knots will mess up the finish of the bread and butter hull. Knots can be drilled out and plugged with a plug of clear wood (if you're equipped to do so).
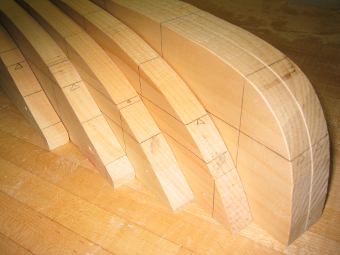
After attaching the template in the boards, I cut them out (roughly) with a jigsaw and doubled up each of them for the opposite hand. Holding each pair together with clamps I drilled and pinned each pair together. The pins I cut from bamboo skewers. Then I cut each pair much closer, about 1-2mm outside each of the buttock lines.
|
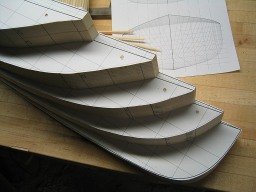
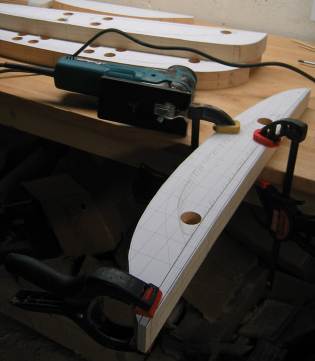
Now is the time to think of how to hollow out the bread and butter hull. It's a good idea whether the model is a working model or static. A hollowed out hull is more flexible and is less prone to cracking. It makes the model a lot lighter too.
Here is the bread and butter method's great advantage over a solid block hull. You can hollow the boards out before gluing them together. A word of caution: make sure there is enough surface overlapping for when you glue up the stack. I left at least 8mm (5/16 inch).
The hollowing out part is more critical for RC model boats than static. You need to make room for the RC gear and get rid of enough material to make it seaworthy. Having said that, don't go too far. There will be opportunities later to gouge out from inside.
I used a Forstner bit in a drill press to get started with the jig saw, but any method will do.
I left some material tying the bottom of the hull together with the deck, like pillars. The intent was to leave some rigidity for clamping and holding the hull. I'm not sure it was necessary.
|
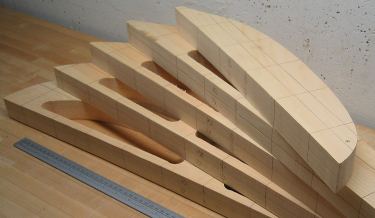
Now is a good time to transfer the water line and stations from the paper template to the laminates. These are critical when the time comes to line up the laminates to each other. Use a good quality square to transfer the lines to the edge of the boards.
Getting ready for the jig saw. Move the clamps as they interfere but don't remove them all together.
|
Time to peel off the paper templates and peek inside. Once the paper template is off, draw the waterline and stations on each side that will face out. Mark the middle station (zero station) - typically where the hull is the widest so you won't shift the locations.
|
Now is also a good time to number the boards and identify the left and right individual in each pair. Mark them where you can read it as you glue up the stack, I did it on what will become the deck side.
Separate the pairs.
|
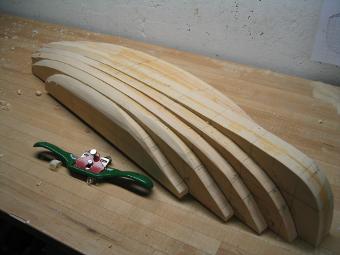
By using the station and waterlines the laminate can now be dry-fitted. Locating the laminates is fairly critical. There are a few different ways to do this. I chose to dowel each board to its neighbor using the same bamboo skewers used earlier. Make sure the dowels are shorter than the thickness of the two boards it is locating.
|
By first locating the relation between two neighboring boards I held the two together with clamps. I then proceeded to drill the first dowel hole - inserting a dowel - and then drilling the second.
When you're done - dry fit. Fix any issues that may crop up.
|
Glue up the bread and butter hull. I used West System Epoxy by the Gougeon Brothers, Inc. This is some heavy duty stuff - I'd say overkill. In hindsight I found epoxy is extremely hard on cutting tools like spokeshaves, planes and chisels.
Looking back, I should have used regular woodworking glue. My favorite is Titebond I, but many others will work too. Some may think you absolutely need to use a water safe glue for working model boats. I'd say not necessarily if the model boats get a good quality finish on it. Think about it, even if you visit the lake frequently, the boat will most likely spend 99% of the time out of the water.
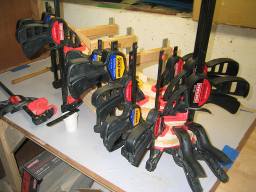
Don't skimp on clamps! There is no substitute, and there is no such thing as too many clamps!

|
Once the glue has cured/dried remove the clamps and mark the deck outline. I ended up making a template and cutting it with a router. I made the template 1.5mm oversize. I'd like to think I saved some time this way.
|
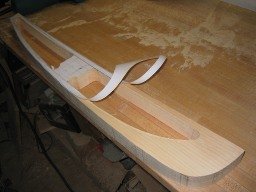
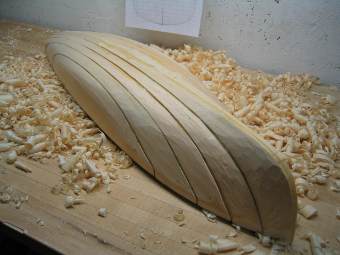
Start carving. Start by rounding off the high edges using whatever tools you have and are comfortable with. I used a spokeshave and a chisel until I got close (see picture below).
As you carve and sand, fill in the hull stations with a pencil every once in a while so you don't loose them.
|
The next step is to refine the form with surforms and sand paper. Alternatively, various sanding and flap discs and on an angle grinder. Be careful not to take off too much. I found myself going at it for a a minute max at a time and check my progress.
|
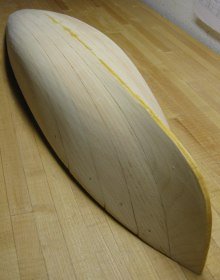
Eventually it is time to bring out the hull templates just like when carving a solid hull to finish the bread and butter hull.


