Build a PT 109 RC Model Boat
Part One
Want plans for this project? Get them at the Plan Store.
A PT 109 RC PT Boat project – how to scratch build a semi scale radio controlled model PT boat from plans. Build your own Mosquito Fleet with your buddies!
The PT 109 is probably one of the best known American ships of WW2. Most famous of course for being commanded by John F. Kennedy – the late President of the United States.
Project Background
I recently scanned the market for RC PT boats. There are a lot of options, but none that fit my budget. It seems converting a Lindberg kit is the easiest and least expensive option.
|
However, I did that many years ago and wanted to try something new. I also felt that I had a good shot at building a better and cheaper PT 109 from scratch.
Project Specification and Goals
Every project needs goals set in the beginning, so here are the goals for this project:
- Quick construction – Like many people, I’m busy and have a family and a day job. I want to finish this model in a matter of weeks spending evenings mostly.
- Semi scale – should look accurate to most people familiar with the PT 109 at 3m (10ft). To achieve this within the time frame, the design needs to be simplified. Not to the level where obvious design features of this boat are lost though. For instance, the sweep of the front third of the deck as seen in profile has to be there.
- Inexpensive to build – The target is to be well under what I’d have to pay for a Lindberg PT 109 kit – about US$100. So, to be clear, before spending $100 the model should be finished to the same level as a Lindberg kit after assembly.
- A better boat - Better handling than Lindberg on the water: meaning less top heavy and lighter weight.
Decision time
To meet the goals above, I made the following decisions:
Construction materials:
Hull - Balsa: It is inexpensive, is relatively easy to cut and glues like a dream with CA glue. This will help stay under budget and limit prep and assembly time.
Superstructure - Cardboard/Balsa: Is free and can be sheared with scissors. Will be used for some superstructure and deck details.
Details - Brass/Hardwood/Styrene: Brass will be used for smaller details that otherwise would break too easily. Other details like hatches and vent cowlings are easiest made from Styrene. Hardwood and cardboard may be used occasionally if it makes sense.
Plans:
Scale: We’ll stick with Lindberg’s 1:32 so we can stay closer to apples to apples. For those who like big boats I have also created a set of plans at 1:24 scale. More below.
Hardware etc.
Running hardware: Single prop, surplus motor and commercial rudder. If there is money in the budget, I'll use a commercial motor coupling. If not, a piece of vinyl tubing will work.
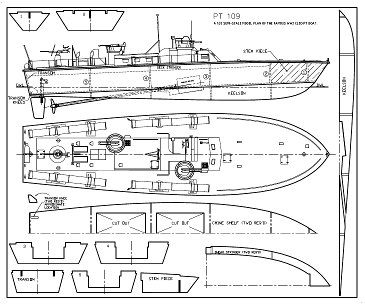
The PT Boat Plan
Without going into too much detail, the plans had to be reworked for simpler and speedier construction. I felt it was important to maintain the shear of the fore deck – a characteristic feature of the Elco's.
This makes construction a little trickier, since the common practice is to build the hull upside down and set the bulkheads flat on the table. To work around this issue, I instead flattened out the knuckle line using a balsa sheet as a chine stringer.
With this approach the number of bulkheads can be reduced without jeopardizing the integrity of the hull as its being built. Also, a straight chine profile is nowhere near as noticeable as a flat deck would have been.
Some curve can be worked back into the chine by careful sanding once the hull is planked. If all else fail, the spray strip can be attached to give the desired illusion of a bent chine. I doubt it's necessary though.
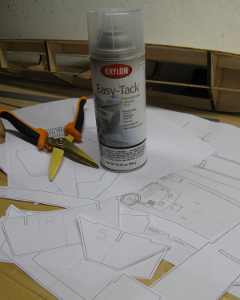
Preparing the Hull Templates
I made the mistake of printing out some of the longer items on small pieces of paper and taping them back together. Instead I should have gone to Kinko's and had it all printed full scale. It is near impossible to piece it back right, and get them onto the balsa without getting distorted.
|
After printing out the bulkhead, false keel, chine and shear templates they were attached to the balsa sheets. Here is what I do:
Cut out the templates with scissors, but leave at least 1/16" (1.5mm) all around. For long and spindly parts, like the false keel and shear templates, leave more (a lot more even, if possible). If they are too narrow, no matter how careful, the templates will not maintain their shape.
I use an adhesive in a spray can that essentially turn the template into one large sticky-note. I happen to have the Krylon brand "Easy-Tack", but 3M's adhesive #75 is the original (3M is more money though). I bought it at the local crafts store.
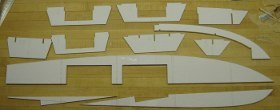
Cutting out the parts
Here is a trick I was told by a model airplane builder many years ago:
When making two identical parts the old fashion way was to use pins to hold one balsa sheet on top of the other. They would inevitably shift and the parts would come out trashed.
Instead, put CA glue down in a few spots (six to eight places on a 4 x 36 inch (100 x 1000mm) sheet). Make the spots as tiny as you can make them – a droplet is way too much – just a touch is enough.
Also, if you pay attention when laying out the parts to be cut on the wood, try and place the dots so they hold the parts together after they have been cut out. This can be a challenge, but well worth the effort.
After cutting the parts out, you can carefully separate the two identical pieces by carefully prying or by cutting using a razor blade. Sometimes there will be a clean split, other times a small piece of balsa will split off. I'd say it's still worth it 99% of the time.
On this model the two chine and shear templates were cut out this way.
|
I use a single edged razor blade and a steel scale (or "ruler") to cut the pieces out. It works fairly well. I typically end up getting blisters on my index finger, so I cut the pieces out over several nights to let my poor finger recover. I'm sure an X-acto knife will work well too.
Since most edges are straight on these parts, I find a steel scale most helpful. I have one twelve and one 24-inch. For curved cuts I typically cut straight cuts first and clean-up with a small model plane - one of those that take razor blades.
If you have access to either a band saw or scroll saw, you'll finish this step in no-time. Be careful with the up-stroke of the scroll saw might separate the two sheets if you use the technique as described above.
Next we're ready to start putting it together...
Continue to RC PT Boat project, part two.


