RC Cabin Cruiser from scratch "Bon Vivant" - First wooden project

by Bruno
(Garmisch-Partenkirchen, Germany)

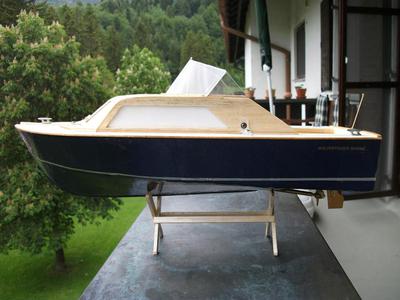
For starters this is the very first thing I ever made out of wood. So you will see my version of Petter’s small cruiser is not a perfect boat. However, I’m very happy and even proud with the result for being a first try. How I got here? I wanted to get a nice R/C boat in the form or shape of either a 70s Sport Fisherman or a 70s Cabin Cruiser. Unfortunately, there is nothing like that out there. All I came across are the “classic” boats, the racing boats, 50s or early 60s sports fishermen, sailboats, military or commercial vessels or just plastic toy boats. So fortunate enough, I came across Petter’s Small Cruiser plan for dummies (I mean, starters) like me. I immediately noticed a potential to make it somewhat resemble one of my favorite boats, an early 70s 25-footer Chris Craft Catalina. As I went along with my work (it took me a little bit over 3 months due to my inexperience and countless unrelated distractions) I ended up with a
boat full of modifications, but with almost an identical hull.

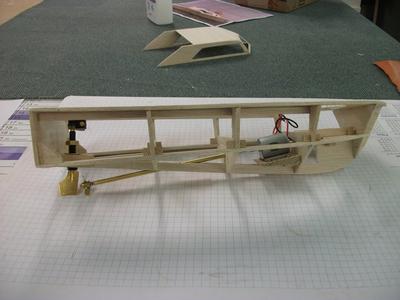
As for its technical changes I’ using a 7.4v battery pack. I kept the same speed controller suggested by Petter and a different motor since I smoked the Cermag unit during initial trials due to the higher voltage. Fun while it lasted. I also got a commercially available brass drive shaft, a rudder and a propeller (3 blade 25mm M2 propeller; an 8” mini drive shaft). I had to cut the shaft a little bit, so next time I will order a shorter one. As a link between drive shaft and motor, I got a little rubber link from the same supplier since where I live some simple things like a tiny silicone tube can be difficult to find.

As for the current motor (just around $8.50 with shipping and handling) which I got through Ebay, these are the specifications:

Mabuchi Series: RC-280SA-2485
Overall Length: 45mm Including Shaft
Voltage Range: 4.5VDC - 9VDC
6VDC is Nominal
No load @ 6VDC::
Speed: 10,800 RPM
Current: 180mA
Medium load (Max Efficiency) @ 6VDC:
Speed: 8,800 RPM
Current: 600mA
Torque: 33g-cm
Stall @ 12VDC:
Torque: 185g-cm
Current: 2.5A
Size Specs:
Overall (Including Shaft): 45mm long x 24mm diameter
Canister: 30.5mm Long (34mm with bushings) x 24mm diameter
Shaft (Smooth, Round): 11mm x 2mm diameter
Operates in either Direction (switch polarity)
3 Pole Armature
85 Turns of 0.25mm wire per turn
Mounting Holes are NOT threaded
2 Solder Tabs for Connection
Weight: 44g (1.6oz)

Great thing was that I used the same nice Cermag motor mount for the new Mabuchi motor. As running time, you may run non-stop full speed ahead for about 10 min and the battery will still have power to go on. The problem is that at that pace you will fry the motor due to overheating. I know this because I kill one (yes, another motor!) like this. So I’m assuming you will have around 15-20 minutes, perhaps 25 minutes of fun if you treat your motor in a civilized manner. Other significant materials I used included marine lacquer, normal off-the-shelf spray car paint and Elmer’s-like waterproof wood glue. Knowing I would waste lots of wood due to my newbie status, I ordered double of what Petter recommended. I’m very glad I did.

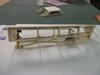
Now the boat. The plans worked great. As a beginner, sanding was a challenge due to the patience required, but it paid off. Mine was far from perfect, but as the work kept going and I saw it turning into something beyond my expectations I became a little bit more demanding. Since I’m not too patient, I admit I skip some recommendations. Something I altered a bit was the rear transom. It was too square-shaped for my taste, so I altered it as a with a very slight semi-v shape and rounded the edges a little bit for a more realistic appearance. Once I built the frame, I applied a first coat of marine lacquer. My biggest challenge: planking. Since there are no planking templates with the plan, I had to make my own. Once planked, I coated the entire hall with marine lacquer more than twice. Perhaps it was too much, but I wanted to avoid any risk of leaks. In fact, I did varnished the bow planks before installing since later it would have been
impossible to reach them from the inside. And then to the cabin. The plans called for a cardboard cabin, but after going this far I went wood. Since I did not knew how to attach the cabin to the hull in a decent way, I ended up improvising by adding 3 tiny screws and small pieces of plastic to keep it firmly in place and be able to open it at will while keeping it fairly covered from the elements. 

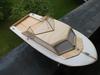
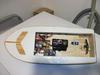
After all that work, the boat came up the way you see it. I ruined the paint job a couple of times, but after putting a couple of coats of car paint lacquer, it ended up looking somehow like fiberglass, which concealed most of the gaps I left during paneling. I only wish I could find little accessories like chairs, steering wheel, etc, to make it look nicer. I see myself improvising some in the future.

It navigates very well. Petter did a terrific job with this design. Very stable and pretty rugged. What would I change? I would make it a little bigger to accommodate a bigger engine (yeah yeah!), perhaps 3 more inches or so. I would also change the bow design to make it a little bit more modern (just my taste). One I think would look great is the one in the old 1970s Bertrams, especially the 46.6 Convertible (aka sports fisherman) or the 1970s Chris Craft Commanders. However, the current shape is pretty functional and capable when heading little waves with my engine arrangement.

Petter, here is a suggestion: Take this great platform, make it a little bit larger (perhaps up to 20 inches) design a sports fisherman with it like the 70s Bertram, Chris Craft or Hatteras, and I assure you many people will request you plans right away. I’ll be the first one in line.

Thank you for bringing realistic hope to R/C modeling super-green newbies like me!

Comments for RC Cabin Cruiser from scratch "Bon Vivant" - First wooden project

Average Rating starstarstarstarstar

Click here to add your own comments

Rating
starstarstarstarstar
screw holder
by: Anonymous

Can you specify what kind and shape of the plastic you used to keep the cabin down (Making my own boat)? Thank You!

Rating
starstarstarstarstar
Excellent build ...
by: Bunty

The build is excellent and have started constructing my own. The hull is almost ready. Deciding whether to glass/epoxy it or to use lacquer and tissue paper.

Any thoughts on preferences?

Rating
starstarstarstarstar
Another build
by: Kensp

I have started a build of my own boat. I have finished the woodwork and now need to laquer it. I am buildig this boat exactly to the plan.

For my next build I intend to redraw the plan with 1 inch added between bulkheads 2 & 3 plus another inch added between bulkheads 3 & 4. This will increase the length to 17 inches.

Rating
starstarstarstarstar
RC Cabin Cruiser
by: Anonymous

Hi Bruno
When i read your article, it felt as if you wrote it on my behalf.
Congretulations!!! It look great.
I have also just started building this cruiser. The same learning than you, i use more wood than you did, i think

I am nearly finished with the hull, and than the cabin.
Petter is very helpful and sent me some photos, which where very helpful.

I will post some photos as soon as it looks like a boat..

Rating
starstarstarstarstar
Video
by: Bruno

Hi,

Sure, you may find the boat in action at https://www.youtube.com/watch?v=Icb9yU-YuXc&feature=youtu.be You will also see a link below your message.

I'm currently working in another pretty interesting project. I bought a Dumas kit of a Coast Guard 41' utility boat ($50) measuring 15 inches to learn from its assembly technology. The instructions are terrible and I'm not happy with the type of wood it brought, but with Peter's ideas and the experience with the Bon Vivant, I used the instructions only for the hull and then to protect my desk from the mess of the glue and painting (LOL). I got a picture of a beautiful boat (a 40'footer San Juan flybridge cruiser) and surprisingly, the hull is very similar. Then I used it as inspiration for the cockpit, which turned out pretty nice. I'm about to finish its planking, so once it is painted I'll post as well. I will use the very same power system as with the Bon Vivant, but I suspect it will go faster due to its design. However, I already see that the Bon Vivant will do much better in choppy water due to its draft. More to follow! B.

Rating
starstarstarstarstar
Nice Work
by: Anonymous

Could you show us any video of Bon Vivant.

Rating
starstarstarstarstar
Bon Vivant Video
by: Anonymous

Here's a recent video

Rating
starstarstarstarstar
About the rudder
by: Anonymous

Anshul,

I bought this rudder from a commercial source. It was supposed to be a "micro" rudder, but it turned out quite big to me. I wanted to keep it as close to a real boat as possible. So I cut the thing and there you see the result. It works perfectly well no matter which speed it goes.

Best,
b.

Rating
starstarstarstarstar
More on Bon Vivant
by: Anonymous

Thank you for your kind words on my first project! I just did some real world tests on this boat. Amazingly, I was able to run the thing in a hotel pool for about 1 hour and 10 minutes while changing speeds and just cruising for fun. The battery/motor combo worked just better than expected. I also took it to a lake with a little of choppy water and it really ran well with very water drops on the rear deck.

In the mechanical side, next time I will try to find a suitable coupling (I imagine those may exist in that size) since the rubber one I use tends to wear relatively easy with the power output I'm using (7.4v). For the moment, I put some Krazy Glue on each side of the rubber coupling and it does the trick (for the moment).

As for the cabin, everything was done the old fashioned way, just by drawing the thing from an old picture and making the templates out of the drawing. I'm kind of computer illiterate! The front and top windshields were pretty challenging due to the angles, but at the end a little bit of patience paid off.

Next thing are lights. I'm checking for some 3mm tiny ones. Let's see how it works out.

Show your boat!

Best,
b.


Rating
starstarstarstarstar
Simply Stunning
by: Anshul

Congratulations,
For this is a result of great hardwork and interest.
This is the most amazing RC model boat I've seen.

I made a model boat of same plan...for my college project...but it is just a 10% of what i am seeing right now haha.(i had to finish it in 15 days :/)
The cabin is so sharp and perfect.
Is this design made by CAD?
I'm so impressed by the internal arrangement.
A very good modification i must say!

The thing that has really surprised me is the rudder size, well the rudder which I fit was 5 times larger than this hah...though i was very well able to maneuver but does this small size has a bigger advantage in taking turns??


Rating
starstarstarstarstar
Thanks Bruno!
by: Petter

That's an awesome boat! ...and what a write-up!

In all honesty, I think you did a much better job with the cabin than the original. I'm also contemplating your suggestion of a bigger version...I think it's a great idea.

The motor upgrade sounds very interesting and definitely a boost in performance. It also sounds like the new motor could benefit from a cooling jacket. You can make your own out of thin copper tubing. It may even be a subject for a future web page.

You made a comment about that there are no planking templates on the plans. I actually had some, but intentionally left them out of the plan. The problem with such templates is that they are not at all forgiving. If your hull structure is slightly off (which is all too easy to do), the planking won't fit. My solution was to use the method illustrated in my build, where smaller panels are added piece-meal, and edges are trimmed once each panel is covered. In any event, the comment is valuable and I may include planking templates in the future.

All in all, a great build, and it sounds like you had a lot of fun - the most important part!

Petter

Click here to add your own comments

Join in and write your own page! It's easy to do. How? Simply click here to return to Model Ship Gallery.

Share this page:
Enjoy this page? Please pay it forward. Here's how...

Would you prefer to share this page with others by linking to it?

  1. Click on the HTML link code below.
  2. Copy and paste it, adding a note of your own, into your blog, a Web page, forums, a blog comment, your Facebook account, or anywhere that someone would find this page valuable.
model boat plans store thumbnail image