Make a Simple Rudder Linkage
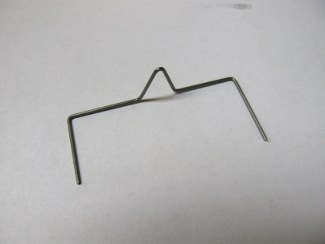
Looking for a simple rudder linkage for your RC boat? Here is how I make most of mine. It's inexpensive and easy to make. Below is a picture to show what it'll look like finished.
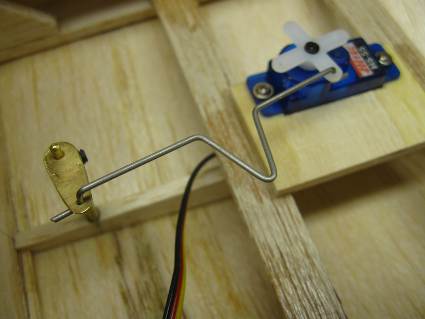
There are several different ways to lay or orient the servo in relation to the rudder tiller. The one shown here is the easiest, most common, intuitive and straight forward. It is always my choice Numero Uno and it covers 80% or more of all rudder linkages I ever need.
Tools and Material
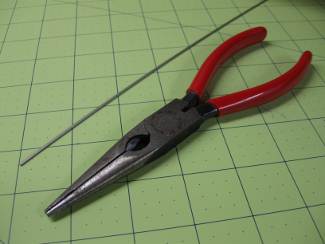
The only tool you need is a pair of needle-nose pliers. It needs to be fairly narrow at the tip as the last dog-leg bends are close together. Mine is about 2mm wide at the very tip. Too narrow and the pliers may be too weak and make the jaws flex too much sideways.
Not all pliers are created the same. Mine happen to be a good quality where the pivot pin is tight as a tick. Again, if the pliers are poor quality, the jaws may flex to the point that they are unusable.
Needle-nose pliers can also be used to cut the wire, so it's the only tool you'll need. Well, if you want to get fancy you may want to file or sand the ends of the wire to take the sharp edge or burr off.
The material for the link itself, I've used piano wire in the passed, but it corrodes and looks bad after a while. It's still functional and may be OK for something thrown together quickly.
Corrosion resistant wire is better. After experimenting with brass and other various exotic spring tempered stainless steels, I've found a relatively easy solution.
These days I use stainless wire meant for making your own fishing lures that I get off of ebay. It's not perfectly straight, which is fine, and a lot easier to bend than the spring tempered wire I've been using, so it's not as hard on my pliers.
The diameter of the wire will differ depending on what servo you're using. I've used .051" (1.3mm) for standard servos and .035 (0.9mm) for sub miniature servos.
Bending the Wire
First I cut a piece of wire about twice as long as I estimate the distance between the servo and tiller. Then I make the first three bends like a gull wing. The proportions differ depending on what size boat I'm building, but I try and make the legs of the inner V about 3/8 to 1/2 inch. These bends needs to be in the same plane, so once it's done it should lay flat on a table top without being able to wobble or spring as you push on it.
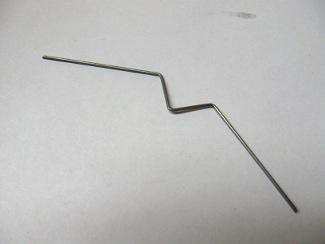
Next, tune the bends so that the V is symmetrical and so the beginning and end of the wire line up in a straight line. I'm not sure what the angle is of the V at this point, but it looks to be close to 30 degrees.
The purpose of the V is two-fold: It provides a means to shorten the push rod once installed in the boat by opening or closing the V. This is necessary because bending a wire with only two Z-bends in the ends to an exact length is near impossible. Secondly, the V provides an inline spring that acts like a servo saver. It may not be critical for most boats while running, but the servo saver never sleeps, so it will protect your servo during handling and transport.
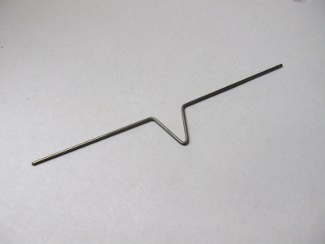
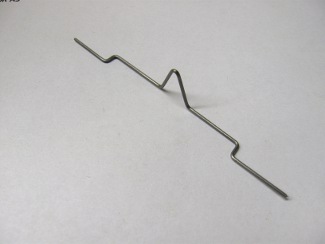
Now it's time to start the two Z-bends at the ends of the rudder linkage. I bend the wire close to perpendicular to the V. At this point I'd rather bend short of 90 degrees rather than over-bend and have to come back as it would fatigue the wire. Spring tempered wire (piano wire etc) is more sensitive than annealed ("regular", softer) wire.
This is the trickiest part, to bend back the wire again. I grip the end-section as close to the bend I can get a hold, and push the end of the wire against a hard surface until it bends. Often while I try and complete this bend, the previous one tends to open back up, so it often turns into a little back-and-forth between the two bends.
Also note that the extra wire at the end of the rudder linkage makes it a lot easier to complete the Z-bends. It's a bit of a balance act deciding how long a wire to start out with as most of the ends will be wasted, but the extra wire makes the last bends a lot easier to complete.
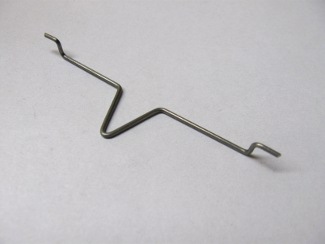
Trim the ends. I leave a hair over 1/8" usually, so about 4mm for my metric friends.
For more information about rudders and rudder linkage, you may find this page interesting.


