RC Elco PT Boat Project
Part Three
Want plans for this project? Get them at the Plan Store.
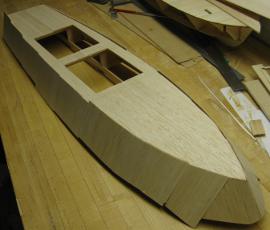
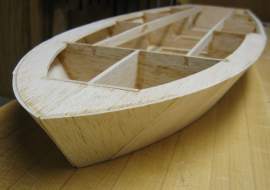
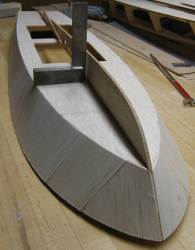
Planking the RC Elco PT boat – The hull of the scratch built, semi scale PT 109 is covered with balsa sheet for light weight and easy construction.
So far the Elco PT boat hull has been framed and sanded. For a recap of the previous step of this RC PT boat build, scroll to the bottom of this page.
Planking the RC Elco PT Boat Hull with Balsa Sheet
There are many ways to plank hard chine model boats like this PT boat. The method I chose optimizes the use of thin (1/16" or 1.5mm) balsa wood. By laying it in panels with the grain vertical, the wood is able to bend around tighter curves, while remaining quite rigid.
It also permits an alternating approach, laying panels on left and right side, minimizing strain and twist while gradually increasing strength.
|
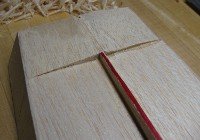
I took some 4-by-36-inch sheet of balsa and cut it into panels with a pair of scissors. I cut them about 1/4-inch longer than I estimated the longest panel to be.
I then started at bulkhead #4 from the stem. I lined up the edge of the panel with the center of the bulkhead, just to give it something to align to.
It is not critical to lay the panel joints right on top of the bulkheads, but it helps. Since we have control over where to put the first one, we may as well take advantage of it.
|
The next panel was attached in the same position on the opposite side. Not to sound like a broken record, but it helps stability to alternate sides. As before, I tacked the panels in place with a few drops of CA glue, with the intent of "soaking" the joints later.
Subsequent panels are easy: line then up next to the previous (making sure it covers the entire height) and attach with CA. I started moving towards the stern, to eventually finish at the stem.
Once at bulkhead #2 it gets a little trickier. First I made sure the previous panel was trimmed back to leave half of bulkhead #2 exposed. Then I let all glue set thoroughly.
Coming back to it, I lined up the next panel's edge to the center-line of the stem reinforcement. As I fitted it I marked with a pencil where the edge of bulkhead #2 was at (making sure I erred to "material-safe").
Next I cut the balsa to the marks. This is a straight cut, so I used the metal scale. Lining up the newly made cut, I could quickly determine how to trim the balsa at the stem to make it perfect. Once happy, I marked first, then trimmed top and bottom edges to overshoot about 1/8" (3mm).
Before attaching it, I dry fitted it on the opposite side. It was close, but not perfect, so I made an "appropriately adjusted" copy. Next these last two balsa panels were attached with CA glue and held in place.
I purposely left a V-shaped gap between the panels at the stem (that will extend along the bottom of the hull). The intention is to fill it in with a strip of some (at this point, undetermined) hard material to keep the edge and make it more durable.
Again, I visually inspected my progress and proceeded with flooding the joints with glue, mostly from the inside of the PT boat hull.
|
Once the glue has dried I started cleaning up the access balsa along the edges. First I used a razor blade and then moved on to 120 grit sandpaper with a long sanding block.
|
I sanded lightly until the edge of the balsa skin was flush with the frame. It may be hard to judge, so a straight edge is a great help. Once close, I sanded a couple of strokes and checked, sanded, checked.
Next it was time to move on to the keelson and lower bulkheads.
|
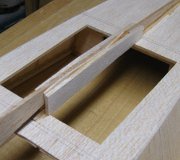
I'm building this Elco PT boat model with a single prop. To accommodate the prop shaft the keel needs to be cut in two. This boat could have been built as a dual prop. Had I done that, the keelson would have been left a single piece.
|
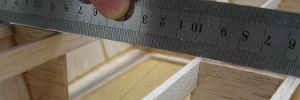
After the two parts of the keelson is in place, it is a good idea to tie them together for stability. It also adds structure in this area to attach the hull planking. My prop shaft is 4mm with a stuffing tube OD of 6mm.
The keelson was built up on either side until I had a channel 1/4 inch wide (6.35mm) for the prop shaft and stuffing tube.
|
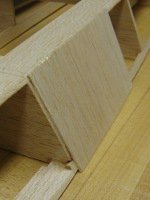
Next I turned my attention to the lower bulkheads. They consist of 1/8-inch triangular piece of balsa. Each were lined up to the pencil marks on chine shelf and keelson, marked with a pencil, and cut to shape. Once they were all cut out I glued them in place.
|
I decided to add solid blocks at the stern to give ample support to the rudder stuffing box.

|
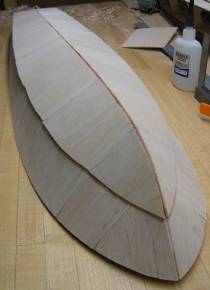
I marked the bottom of the keelson with a red marker. This helps keep track of the sanding progress later.
|
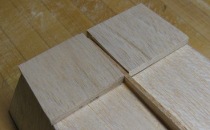
The balsa I used for rudder support was too hard. It was difficult to cut and sand flat. Eventually I got it "close enough" though, using the trusted plane and sanding. It would have been better to use smaller blocks of lighter density balsa.
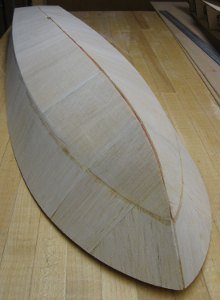
At this point it was again time to sand. The keelson needs to be tapered and the chine shelf and side planking (done previously) needs to be sanded for the bottom planking to lay with good contact.

|
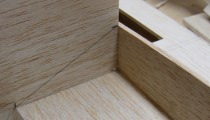
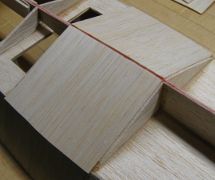
The most critical area is at the chine between stem and second bulkhead. Here the angle between the side and bottom planking is rather flat. The lower planking has to overlap the side planking.
To do this successfully the side planking has to be thinned to about half its original thickness (see picture above). If this is not done right, I'd probably sand through the lower planking.
|
Once happy with the sanding I started the planking. Once again I started at bulkhead #4 and worked towards the stern, while alternating sides.
Here each panel had to be trimmed at the keelson. First I cut up a balsa sheet with scissors, making them at least 1/4" (6mm) too long. Then I line up one edge - for the first panel down the middle of bulkhead #4 - for subsequent panels I just butted them up next to the previous one.
Once I have it in position with 1/16" (1.5mm) overshoot at the keel, I mark the panel with a pencil where the taper of the keelson ends. I remove it, lay it flat on the table and cut with a straight-edge and razor blade. Then glue in place.
|
From here I kept planking towards the stern first and later finish up. One thing that I found helpful was to trim the panels in the front section closer at the chine line. It makes it a lot easier to work out the overlap.
The way I did that was rather unsophisticated. First I trimmed the keel end and lined it back up. Then I eyeballed the chine line left to right and followed "best guess" with a pencil (going "material safe"), and trimming to the line. Often the first attempt was too conservative, so a new line was drawn etc. I ended up with an overlap of about 3/16" (4-5mm).
|
Once planked, again more glue where needed in dry spots and left over night. Next day it was time for trimming and sanding. Here it's important not to round over the chine line, but instead hold the razor blade and sandpaper away from the edge.
Continue to Part Four: Adding hatch coaming and laying the deck.
Recaps of the Elco PT boat build:
Part One: Start of the PT 109 build.
Part Two: Cutting out parts and framing the hull of the RC PT boat.


